As part of my ongoing Continuous Integration/Continuous Delivery (CI/CD) series, it’s GitLab’s turn under the microscope. As one of the leading Source Control Management (SCM) vendors, GitLab has a strong following in open source circles. But trailing GitHub in the marketplace, the company has been busy improving their game and creating products to cover all areas of Software Development Life Cycle (SDLC), with an aim to satisfying enterprise needs including CI/CD.
In this post, I’ll explain how to set up a CI/CD pipeline on GitLab for a Python project, incorporating an ActiveState Python runtime environment and tooling, but the method applies equally to Perl projects, as well. If you read my post on setting up GitHub CI/CD, you’ll notice many similarities, mainly because both of these vendors come from an SCM background. This time around, I’ll also take advantage of new deployment functionality in ActiveState’s CLI, the State Tool to reduce the execution time of our builds. Let’s first see how GitLab integrates CI/CD into their overall offering.
GitLab Overview
Just like GitHub, GitLab is originally known for its source control and management system. On GitLab you work with Projects, which correspond to software products (components, applications, etc.). GitLab’s free and paid offerings are all built around this Project feature.
When you browse into a project, all of GitLab’s features can be accessed from the sidebar on the left, grouped under headings:
- Repository for source code storage and management
- Requirements for product requirements
- CI/CD, which we’ll go into details of shortly
- Operations for deployment-related features
- Packages for managing individual packages and containers
- Analytics for analyzing CI/CD operations and SCM actions like commits
There are also a number of features under Security & Compliance as well as other groups that are only available in paid plans.
GitLab is trying to hook its SCM functionality into the entire SDLC in order to create a complete, integrated system for software product development, all accessed from an easy to use interface.
Now that you know your way around GitLab, let’s dive into the CI/CD feature set.
Getting Started
Once again, I’ll be using the same sample application, which is written in Python and hosted on GitHub. Instead of using the code on GitHub directly, GitLab “clones” it and runs the CI/CD process on the GitLab copy. You can set up syncing (a.k.a. mirroring), so any changes in your GitHub repo get synced automatically to the GitLab copy. As an alternative, you can migrate your code into GitLab and use push synchronization to mirror changes back to wherever the code came from.
In practice, if you end up keeping your code in another system like GitHub, committing your changes there (including changes to GitLab CI/CD configuration) and then triggering a CI/CD build when GitLab’s mirroring sync kicks in, it will work fine. It’s still a bit more awkward than doing everything in GitLab though, and GitLab nudges you to use their integrated product set.
For the runtime environment, you could use the default Python environment provided by GitLab (more on that in a minute), but we’ll use the ActiveState Platform to host our Python runtime environment and Github to host our code. In this way, no matter where the build happens, we have definitive sources of truth to pull from. For the ActiveState Platform, we’ll use its CLI, the State Tool to pull down a custom runtime environment, which includes a version of Python, as well as all the packages and dependencies the project requires. The last remaining step will be to build and run the sample project’s tests for a successful round of development iteration.
First things first:
- Sign up for a free ActiveState Platform account.
- Check out the runtime environment for this project located on the ActiveState Platform.
- Check out the project’s code base hosted on Github, and fork it into your GitHub account.
All set? Let’s dive into the details.
Setting up GitLab CI/CD for your Project
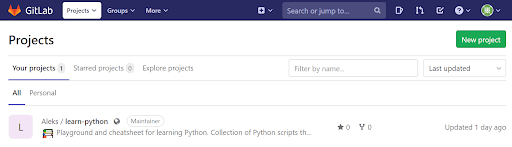
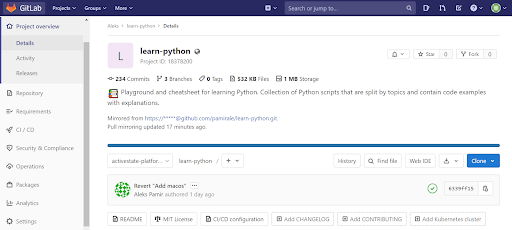
To start, let’s create a project in GitLab and clone our GitHub project there.
1. Log into GitLab and create a new project.

2. Click on the CI/CD for external repo tab because our sample code is already hosted on GitHub. Clicking on the GitHub button here will prompt you to input your GitHub credentials (you will need an API token), and display a list of your repositories to choose from.

3. Locate your learn-python repo and click the Connect button to start the cloning process. When it’s ready, you can click the Go to project button to access your cloned repository on GitLab.
At this point the Pull mirroring is already set up for you, so you can either commit changes to the GitHub repo (recommended for longer term use if you don’t want to migrate your project to GitLab), or use the GitLab copy (if you actually want to migrate, or just want to try it).
4. To define the CI/CD Pipeline, edit the yaml file called gitlab-ci.yml located in the root folder of your project:
# Use Alpine + glibc image from Docker Hub
image: frolvlad/alpine-glibc
# Optionally use caching (currently it slows down instead of speeding up, so not using)
#cache:
#  key: "$CI_JOB_NAME-$CI_COMMIT_REF_SLUG"
#  paths:
#  - workspace/.state/
before_script:
# Install state tool
# We need to use the commands below due to one-line install script having dependencies (no curl in Alpine)
  - wget https://platform.activestate.com/dl/cli/install.sh
  - chmod +x ./install.sh
  - ./install.sh -n -t /usr/local/bin
# Download and install the language runtime
  - state deploy shnewto/learn-python
test:
  script:
# Lint code
    - pylint src
    - flake8 src --statistics --count
# Test code
    - pytest
- The first line points GitLab CI to DockerHub using the
image:tag, and grabs an Alpine Linux container image.Like Google Cloud Builder and some other CI/CD systems, the cloud version of GitLab we’re using requires a Linux container image to host the runtime and perform the actions on the build pipeline. Note that GitLab Runners can be installed on premise to support Windows and Mac, but the cloud-based Shared Runners have been limited to Linux (at least until recently). - I’ve commented out GitLab’s caching since it will actually slow the build down. GitLab assumes that dependencies are going to be installed using pip, or some other package manager. By using ActiveState’s Python, ActivePython, we get all of the language environment and dependencies bundled into one package, so downloading and extracting it every time is still faster than using GitLab’s stock language images and pip-installed dependencies.
- The
before_script:section installs the State Tool and downloads the runtime. Installation is a bit more complicated than usual (three lines instead of one), but that’s mainly due to Alpine not having curl.
- Downloading the runtime is now a very simple command called
deploy, which eliminates the need for an ActiveState .yaml file to sync our language runtime into the CI/CD environment. Nor do we need a “secret” to authenticate with the ActiveState Platform since we’re using a public runtime.Thedeploycommand downloads and installs the Python runtime environment prepared on the ActiveState Platform into the container image. This method creates a global, system-wide installation of Python. As such, it is useful for deploying into isolated, single-use containers like the ones used in CI/CD.
- Scripts in the
test:section ofgitlab-ci.ymlfor linting and testing are just the regular commands you would use in Python.
For more information on configuring pipelines and using advanced features in your scripts, please refer to GitLab’s Pipeline documentation.
5. Once you create this file and commit your changes (and your changes are synced to the GitLab repo if you’re making them on GitHub), a Pipeline for this project will be created on GitLab CI. You can see the details in the CI/CD feature group under Pipelines.

6. You can see the build status, as well as other details in the list, and can see more details by clicking on the Pipeline ID.

7. Clicking on Jobs will show you the detail of the actual run:
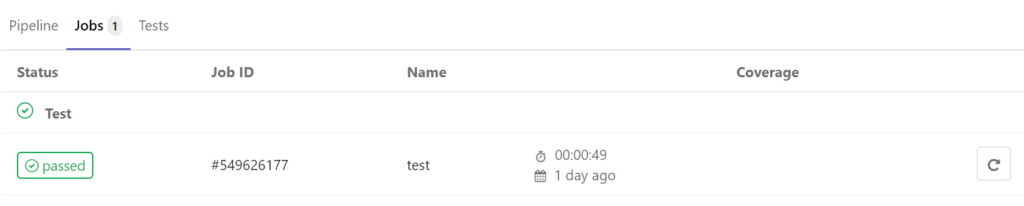
By clicking the Job ID, you can view the build logs and diagnose any issues that may have caused a build failure.

If you’ve followed my other CI/CD posts, you’ll know that these features are pretty much standard for any cloud-based CI/CD system, and are well covered by GitLab’s easy to use interface.
Conclusions
When it comes to CI/CD in the cloud, GitLab has everything an organization standardized on containers and Linux requires. For enterprises that require CI/CD on premise, GitLab’s Runners provide support for Mac and Windows, as well as Linux. For cross-platform CI/CD on premise, the only big competition is Jenkins, whose user base GitLab is aggressively courting.
For organizations that require native Mac and Windows support in the cloud, much of the competition has an advantage over GitLab. Even though GitLab supports these via Runners, they will have to be set up and maintained by the user (sometimes on third-party services). Having full integration to those operating systems in GitLab’s own cloud infrastructure will be compelling to those that require cross-platform support.
The proliferation of CI/CD offerings on the market can make it difficult to choose the one that’s best suited for your product and development workflows. Each vendor is trying to capture their own corner of the market, starting from their strengths. For example, GitHub is taking an integrated, holistic approach to the SDLC, and trying to provide different tools for all the phases and needs, including CI/CD. GitLab, as GitHub’s nearest competitor, is taking a similar approach.
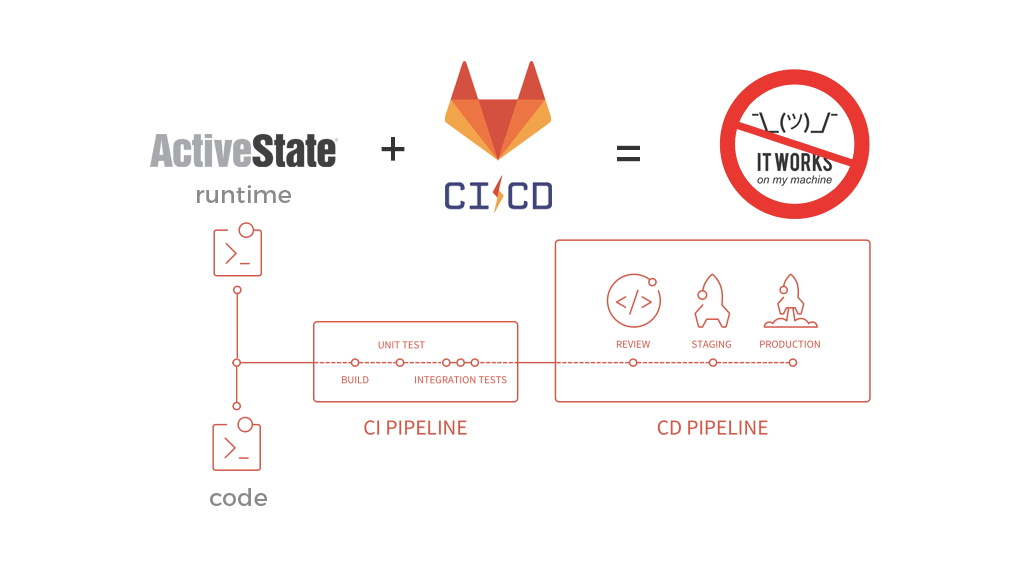
Having a complicated development workflow increases the need to use a CI/CD product, but it also complicates the setup of the CI/CD environment itself. The ActiveState Platform, in conjunction with the State Tool, simplifies development workflow and CI/CD setup by providing a consistent, reproducible environment deployable with a single command to developer desktops, test instances and production systems. In contrast to the Docker approach to environment consistency and reproducibility, which is based on IT requirements, ActiveState offers a developer-friendly way of synchronizing environments across dev, CI/CD and production systems.
As a result, the ActiveState Platform effectively eliminates the “works on my machine” problem and simplifies the setup of a more secure, consistent, up-to-date CI/CD pipeline. Additionally, since the ActiveState Platform builds all runtime packages and dependencies from vetted source code, binary artifacts can be traced back to their original source, helping to resolve the build provenance issue.
- If you’d like to try it out, sign up for a free ActiveState Platform account where you can create your own runtime environment and download the State Tool.
- How does your enterprise’s practice of CI/CD compare to other enterprise’s CI/CD practice? Our State of Enterprise CI/CD 2020 survey has concluded and the results have been published here. Find our CI/CD resources here.

Related Blogs:
Solving Reproducibility & Transparency in Google Cloud Build CI/CD Pipelines